
Online appointment guide
Book with less guesswork. Get unstuck in minutes.
Follow six real booking screens from service selection to payment. Each step explains what to enter, why it matters, and the safest fix when something goes wrong. The form is the longer half: an online appointment itself averages 3-4 minutes once you join the call.
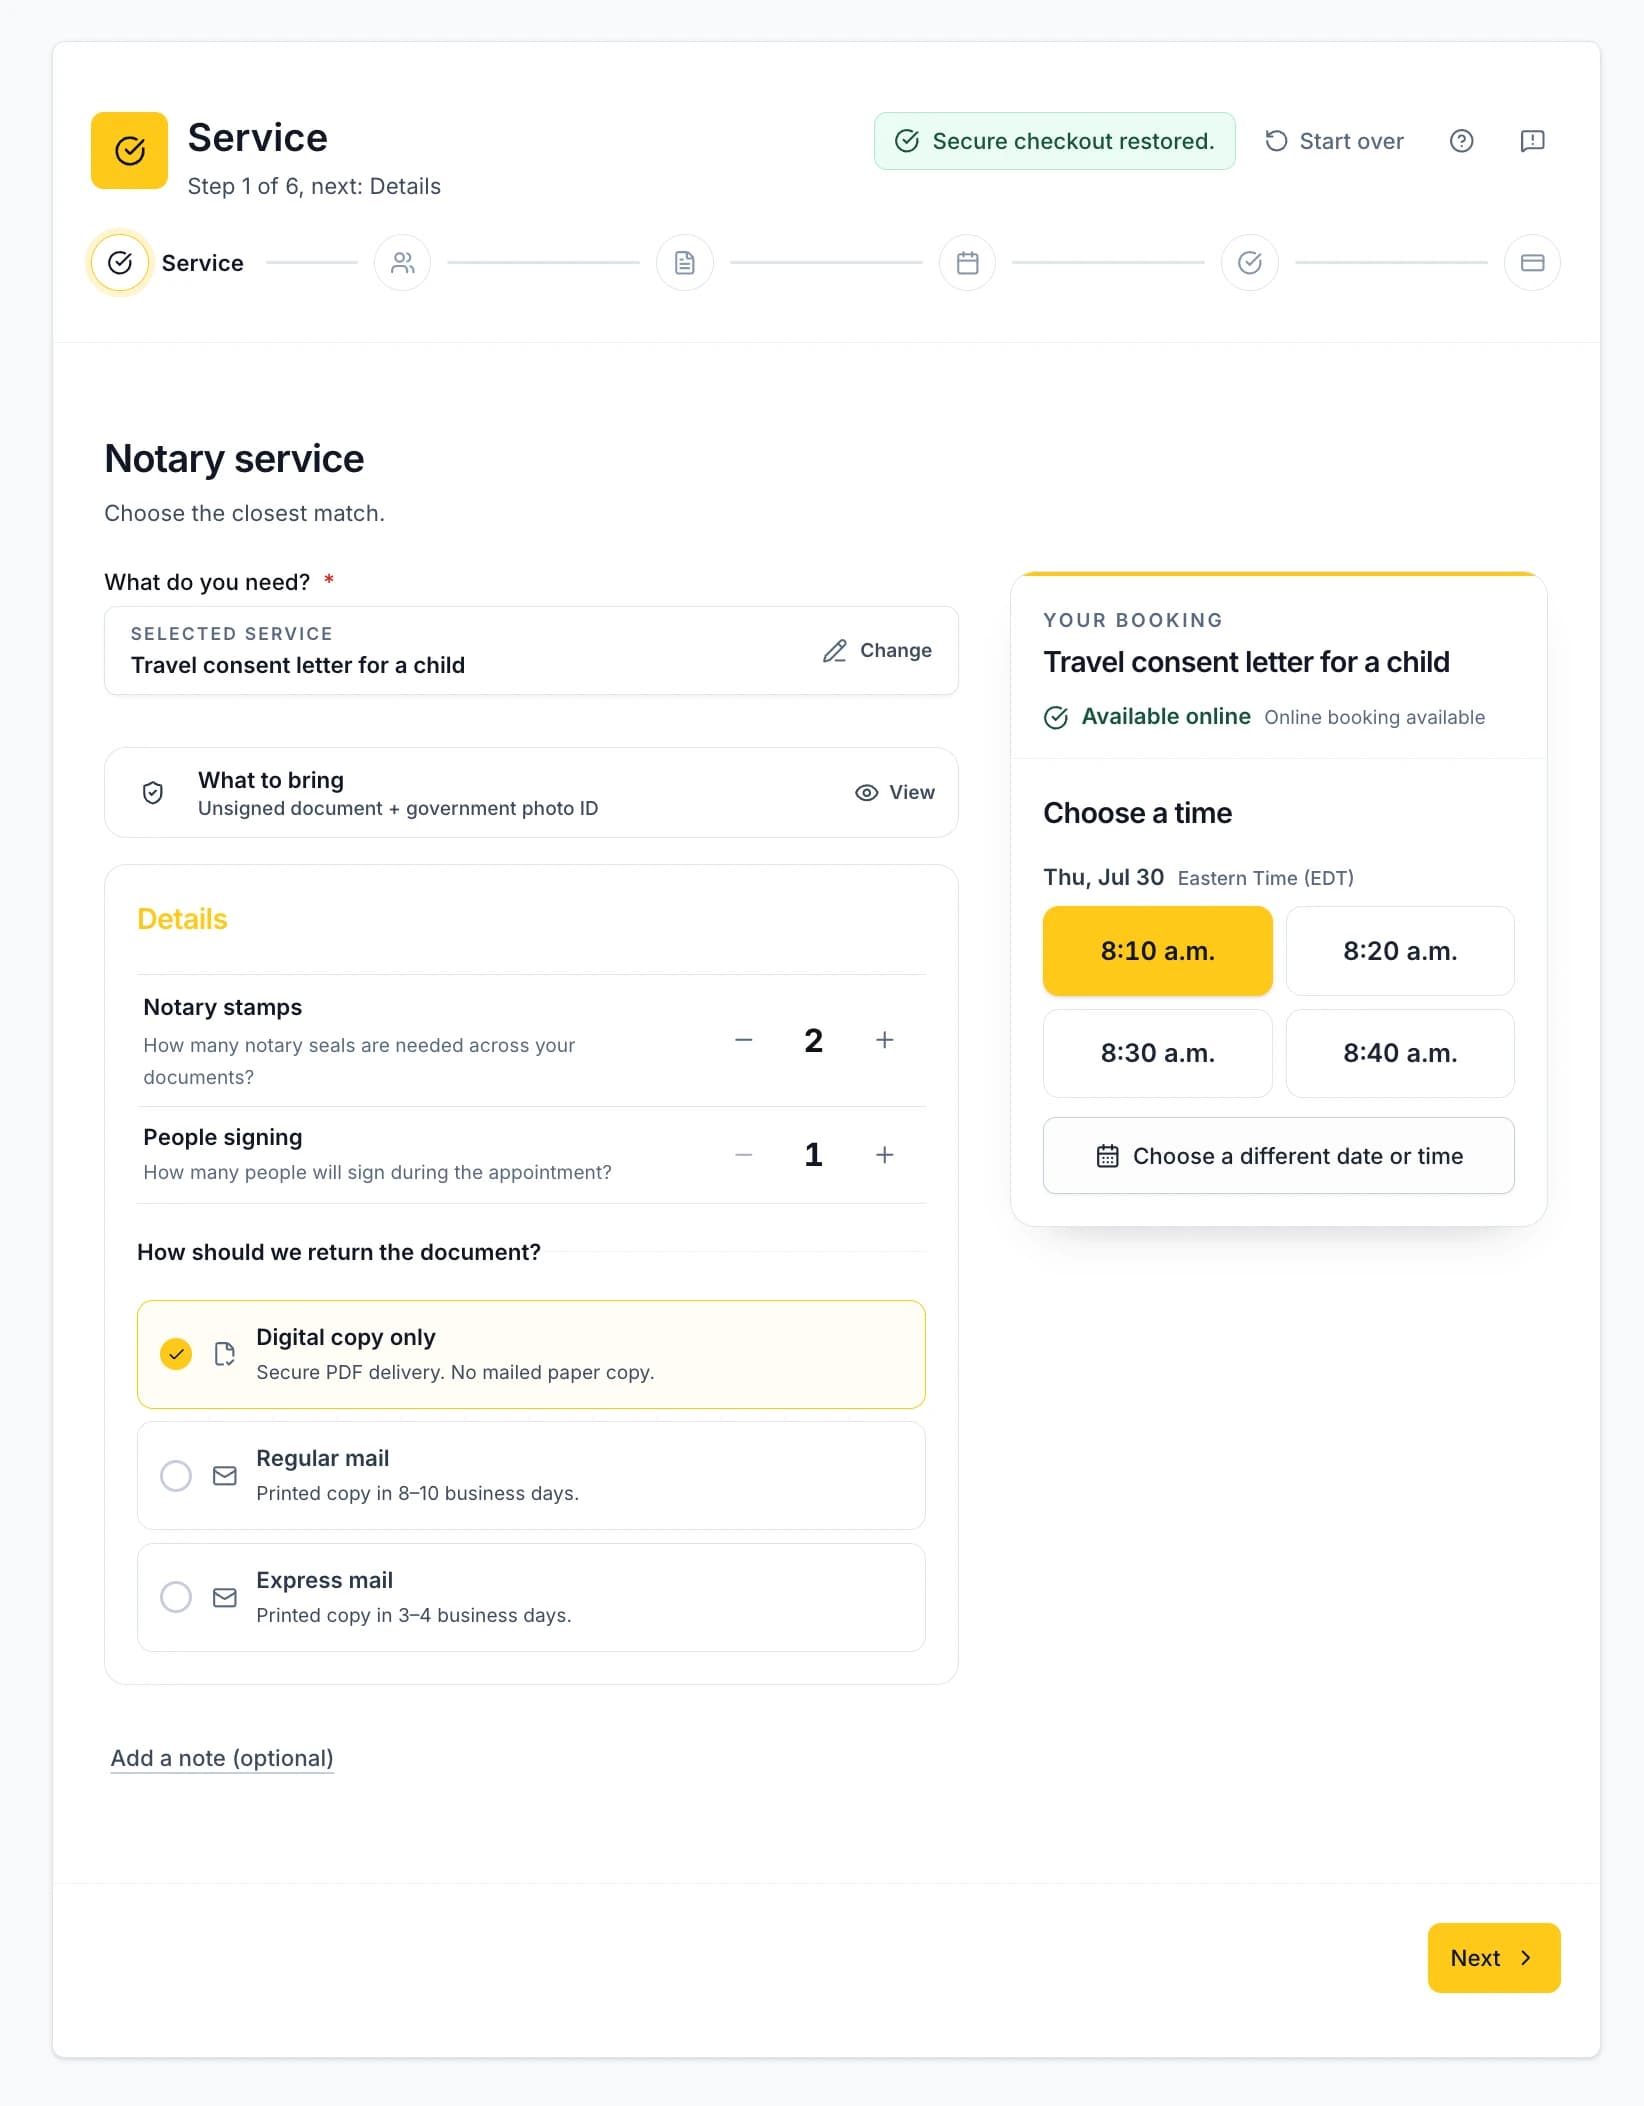
Six real screens, with practical fixes for the moments that usually cause trouble.
1Step
Choose a service
This tells the notary what kind of appointment to prepare. You do not need to know the legal name perfectly.
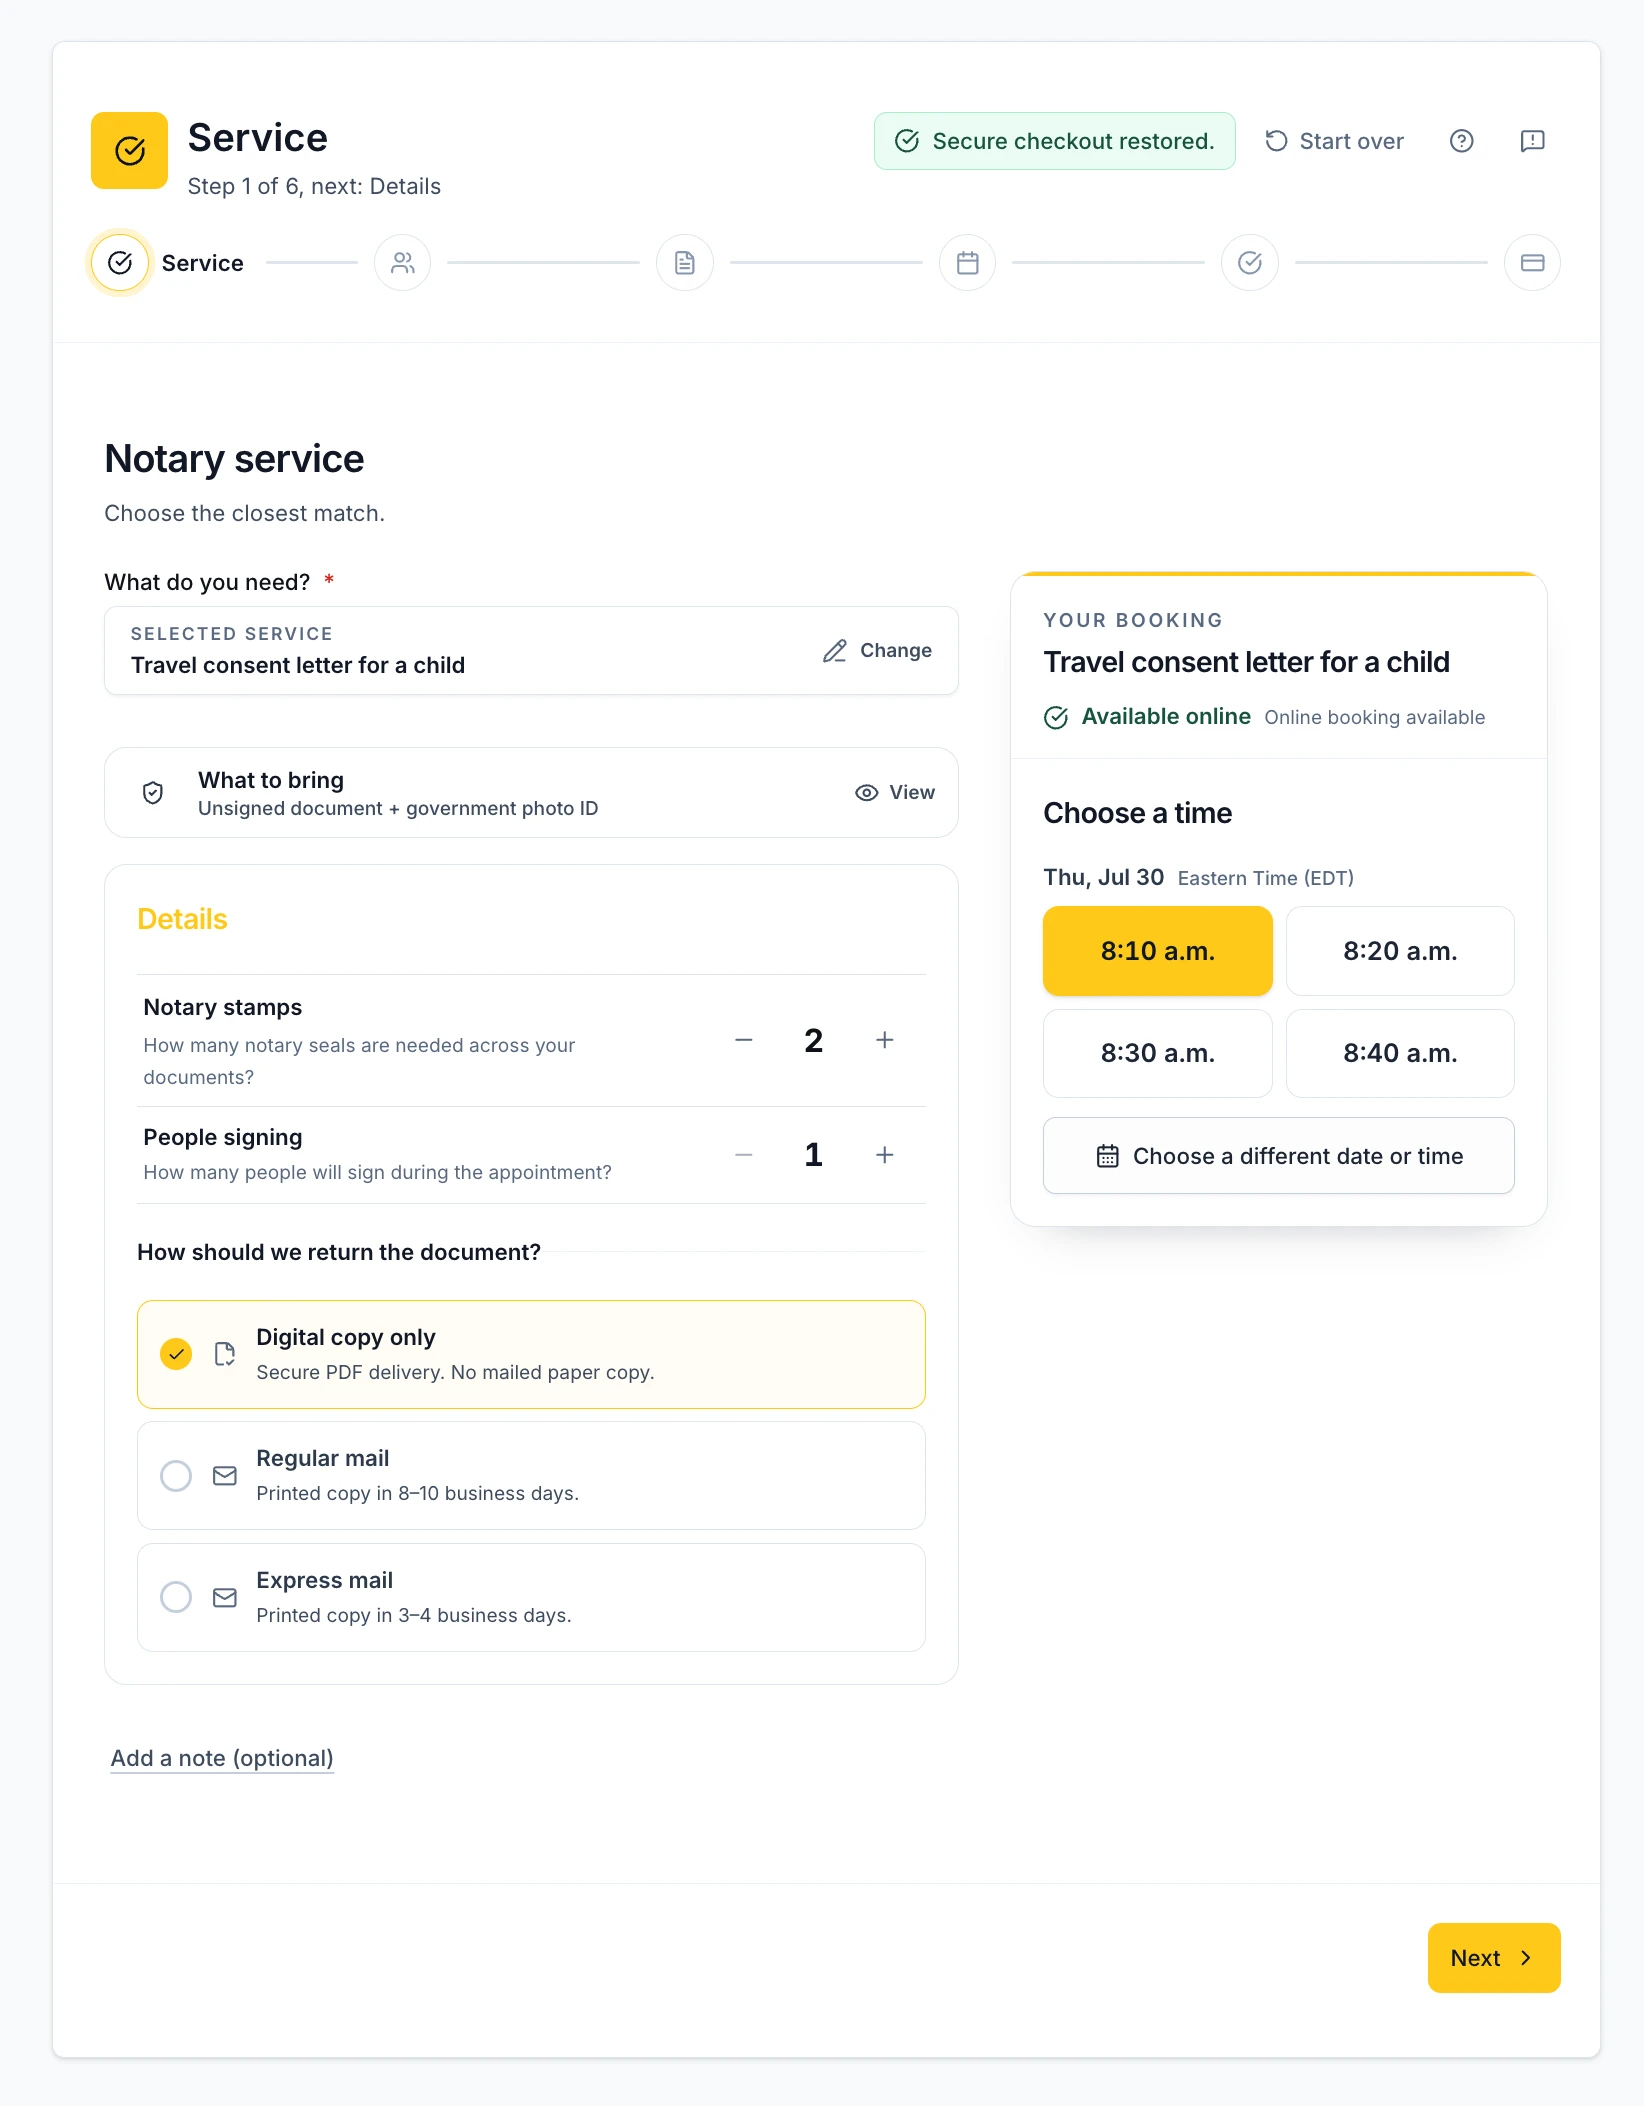
- Choose the closest match to what your document asks for.
- Set Notary stamps to the seals needed across your documents, then set People signing to everyone who will actually sign during the appointment.
- Choose digital delivery or a mailed paper copy. Mail timing and cost appear before payment.
You’ll need
- The document or a photo of its first page
- A rough count of people signing
What each field means
| Service | What kind of notary appointment you needChoose the closest match; explain uncertainty in Details. |
| Stamp count | How many notary seals the document itself needsPeople who will sign are added separately, as signers in Details. |
| People signing | How many people will sign during the appointmentInclude each signer, but not someone who is only attending or helping. |
| Document delivery | Whether you want a secure PDF only or a mailed paper copyMail adds delivery time and cost; the digital copy is the default. |
Find your situation
Solve a problem at this step
Choose what you see on screen. Each answer explains why it happens, what to check, and the safest next action.
You cannot find an exact service name.
Why this happens
The picker uses the notary service, while your document may use a different legal or organisation name.
Check these first
- Search a plain-language phrase such as “signature”, “affidavit”, or “certified copy”.
- Read the eligibility note beside the closest result.
What to do next
Choose the closest match and describe the document in Details. There is no need to pick a different service just to match the label; we will confirm the right one with you.
The total changes after you increase stamps or add another signer.
Why this happens
The stamp control counts seals needed by the document. Each signer after the first adds one billable signer charge automatically.
Check these first
- Count the notary seals or notarized signatures required by the document, not its pages.
- Count every person who will sign using People signing. Notary stamps are counted separately, so there is no need to increase them when you add a person.
What to do next
Enter the document seal count under Notary stamps and the number of actual signers under People signing. Details will ask for each signer’s identity. Use the itemized total on Review to confirm the setup.
The service says it cannot be completed online or needs review.
Why this happens
Some documents require an original paper inspection, wet-ink signing, or a notary check before an online appointment is appropriate.
Check these first
- Read the eligibility message shown with the selected service.
- Check whether the receiving organisation asks for an original, wet-ink signature, apostille, or in-person notarization.
What to do next
If the screen blocks online booking, use the contact option shown instead of choosing a different service. If it says review is needed, continue with the correct service and describe the document clearly in Details.
Contact us when: Contact us before booking if the document is urgent, restricted, or asks for a service you cannot find.
2Step
Add your details and signers
These details let us contact you and prepare the right signer checks. Use the spelling shown on each person’s government ID.
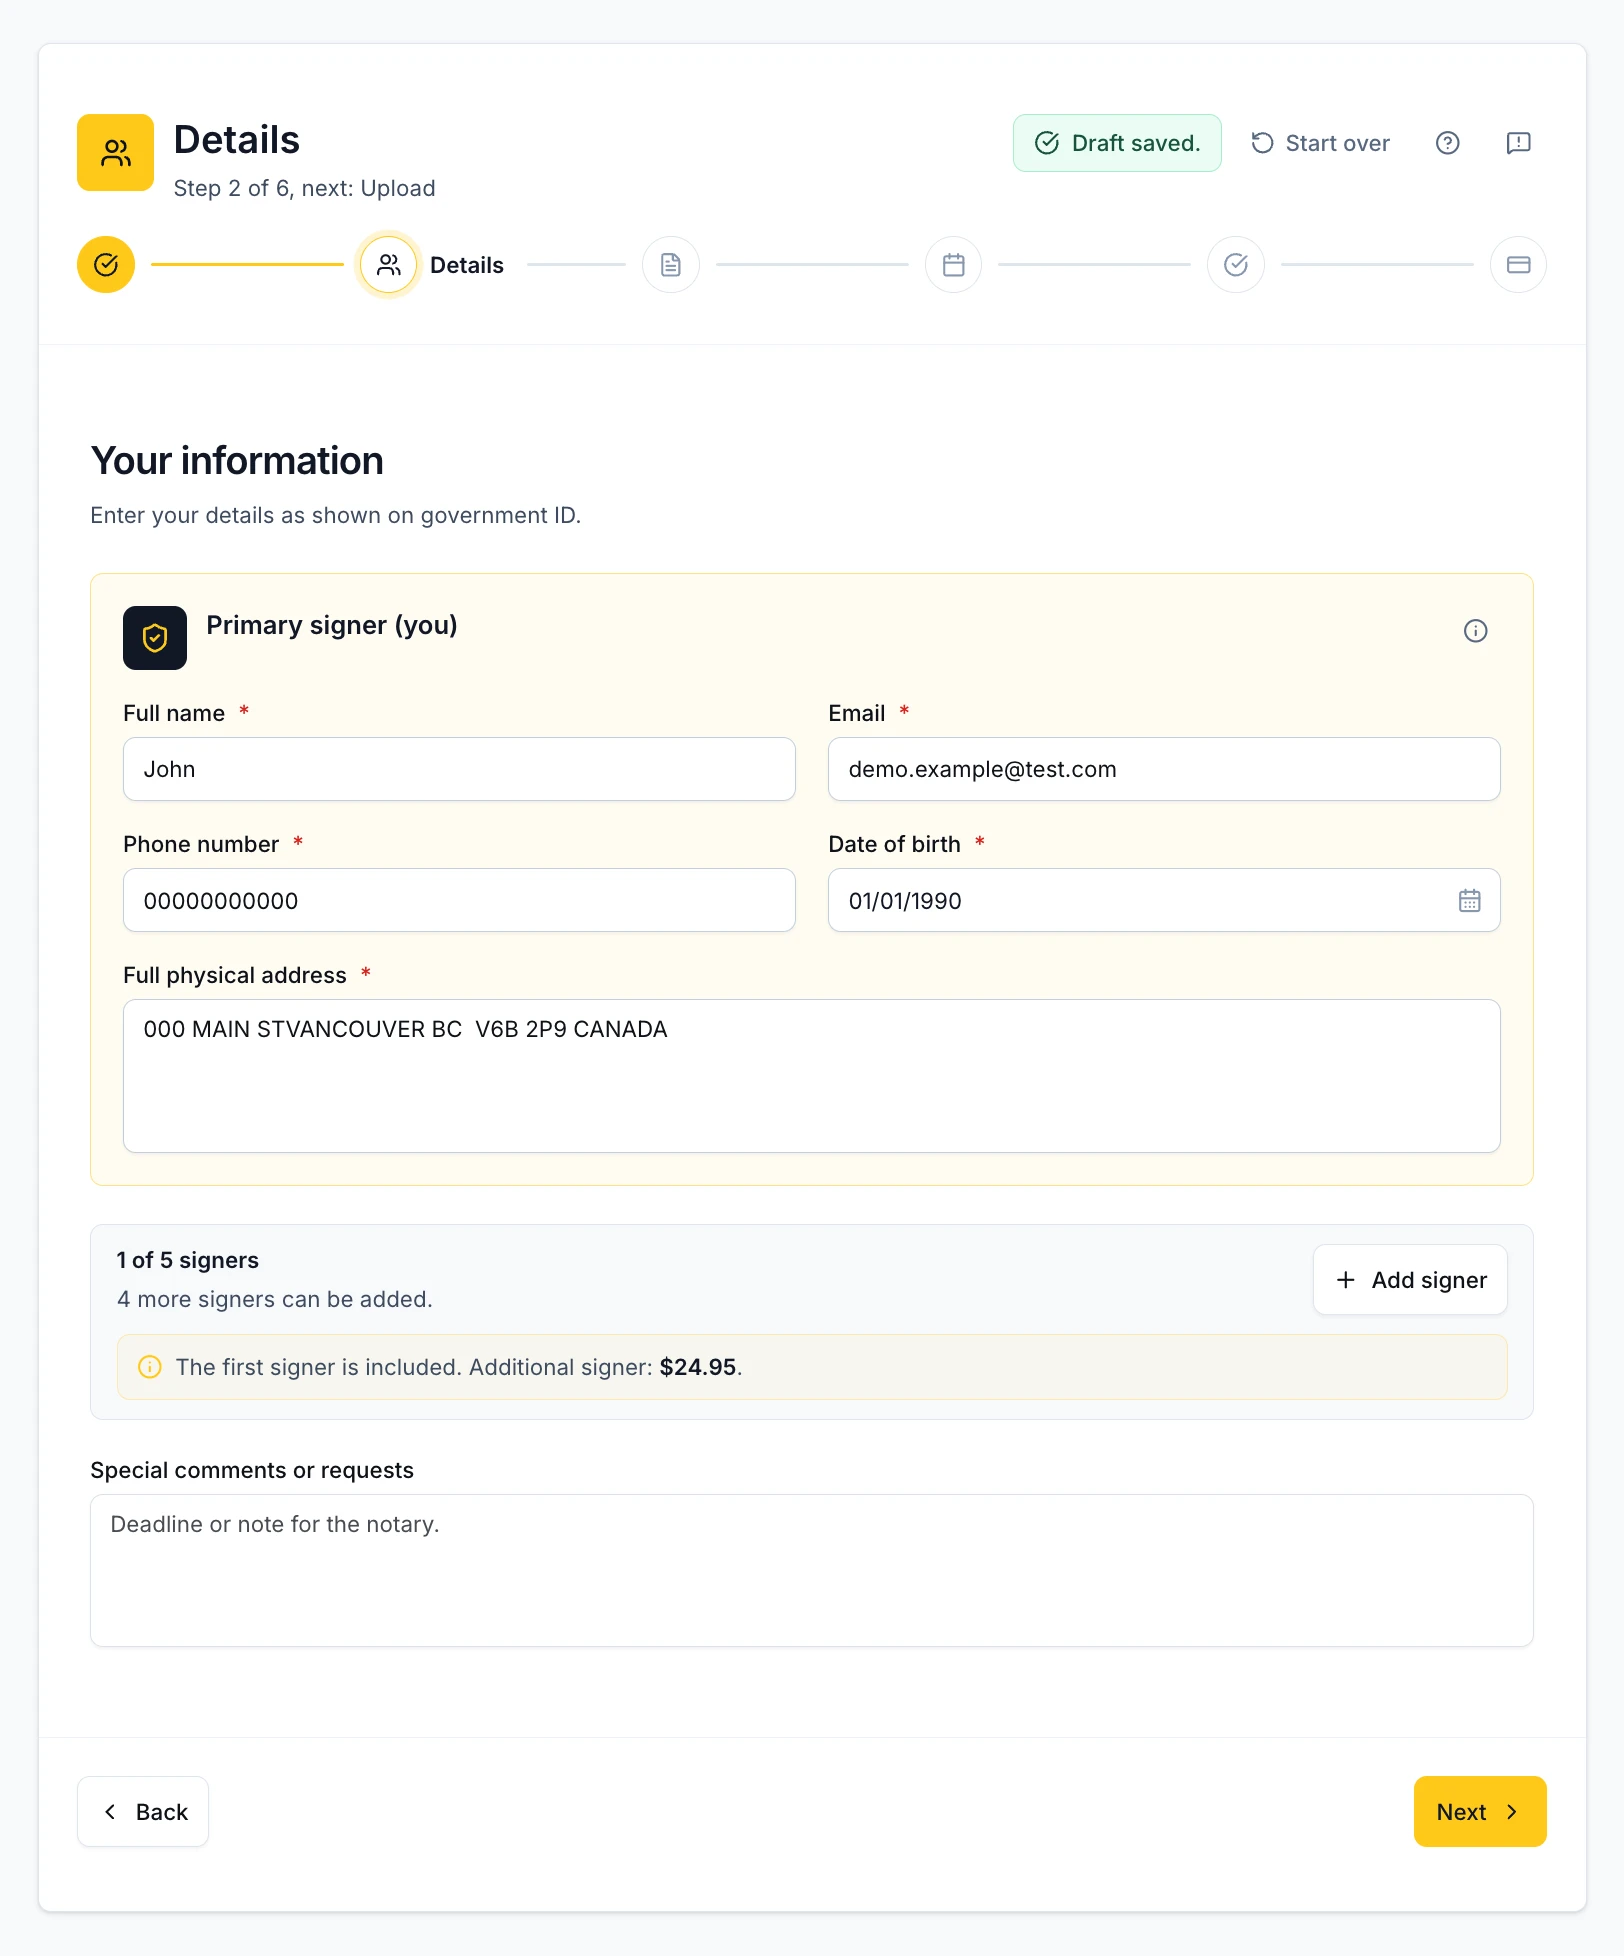
- Enter your contact details so appointment updates reach you.
- Add every person who will sign. Add a signer when another person must sign, not for someone only reading the document.
You’ll need
- Legal names
- Email and phone
- Address and date of birth
What each field means
| Legal name | The name used for identity checkingAs shown on the signer’s government ID. |
| Email and phone | Appointment and follow-up contactUse an inbox and number you can access during the appointment. |
| Date of birth | Identity verificationEnter the date as shown on the ID. |
Find your situation
Solve a problem at this step
Choose what you see on screen. Each answer explains why it happens, what to check, and the safest next action.
Next stays disabled or jumps back to a field.
Why this happens
A required contact or signer field is incomplete or does not match its format.
Check these first
- Look for the red message under the field; the wizard focuses the first missing field.
- Check email, phone, date of birth, and address for the primary signer and every added signer.
What to do next
Complete the highlighted field, then select Next again. A person who only witnesses or reads does not need to be added as a signer.
You are unsure whether to add another signer.
Why this happens
Signer count is for people whose identity the notary must verify and who will sign, not everyone attending.
Check these first
- Ask who will place a signature or make the declaration.
- Check whether the document has separate signature blocks for another person.
What to do next
Add that person now. The additional-signer price is shown before payment, so you can review it before continuing.
The date of birth is rejected even though every box is filled.
Why this happens
The booking accepts a real past date in year-month-day order. Future dates, impossible dates, or a year more than 120 years ago are rejected.
Check these first
- Compare the date with the signer’s ID and make sure month and day were not reversed.
- Check the year carefully, especially if the date picker filled it automatically.
What to do next
Select the date again from the picker or type the exact date shown on the ID. If the ID itself has an unusual or incomplete birth date, please contact us and we will help.
Contact us when: Contact us if a signer has no standard ID, is under 18, or needs an interpreter or accommodation.
3Step
Upload documents and IDs
Upload the unsigned document first, then the requested ID images. Clear files help the notary prepare before the call.
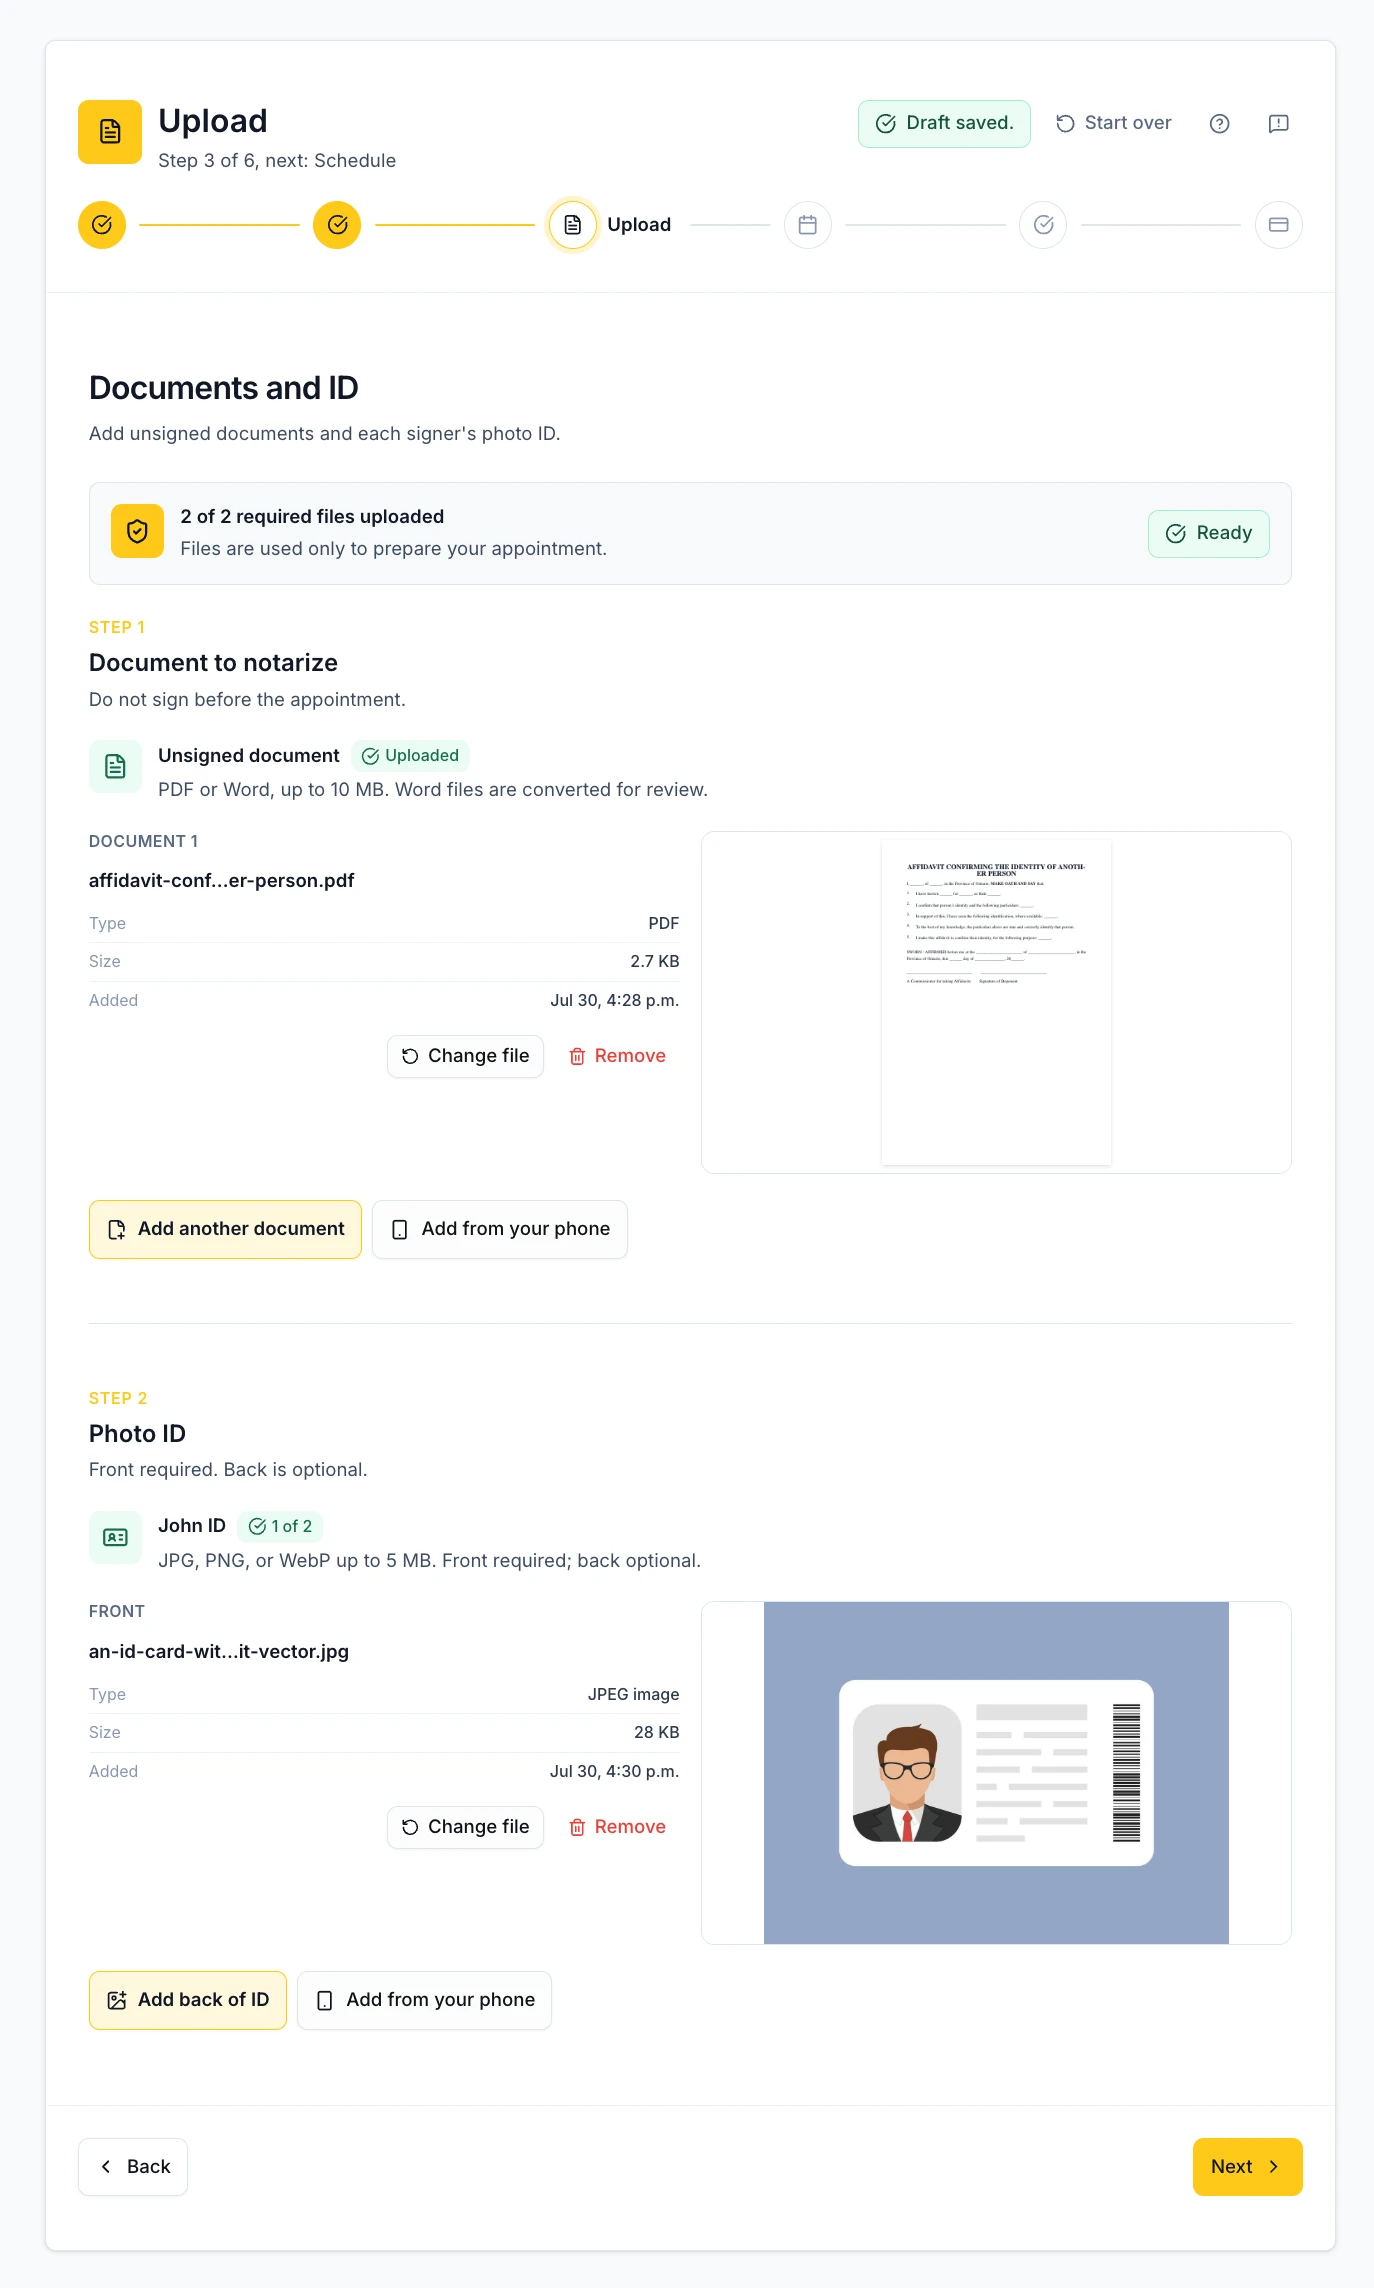
- Upload the document that will be signed or witnessed.
- Upload the front of each signer’s ID. The back image is optional unless support asks for it.
- On a computer, a copied screenshot of the ID can be pasted straight into the ID slot with Ctrl + V (⌘ V on Mac) — no need to save the image first.
You’ll need
- Unsigned PDF or supported document
- Readable government photo ID
What each field means
| Document | The unsigned file to witness or commissionUse a clear, readable PDF where possible. |
| Signer ID | Identity evidence for each signerThe front is required; the back is optional unless support asks for it. |
Find your situation
Solve a problem at this step
Choose what you see on screen. Each answer explains why it happens, what to check, and the safest next action.
The file is rejected immediately.
Why this happens
The file type or size is outside this slot’s rules.
Check these first
- Unsigned document: PDF or DOCX, up to 30 MB.
- Photo ID: JPG, PNG, WebP, or a PDF scan, up to 20 MB; the front is required and the back is optional.
What to do next
Export the document as a readable PDF or choose a smaller, clear image. Please remove any password protection before uploading.
The progress stops, then the file row says the upload failed.
Why this happens
The upload did not finish within the 30-second safety window. A connection drop, a sleeping phone, or a temporary storage response can cause this even when the file itself is valid.
Check these first
- If the row has a Retry button, this is a recoverable file upload error. If the whole wizard says the session expired or checkout started, use the separate recovery below instead.
- Open another simple page to confirm the device still has a connection; on a phone, keep the browser in the foreground during the retry.
What to do next
Select Retry beside that exact file once. If the same file fails again, change from Wi-Fi to mobile data or another stable network, then choose the file again. Please leave files that uploaded successfully in place so that duplicates are not created.
A DOCX upload asks for approval or conversion fails.
Why this happens
Word files are converted to a PDF preview before they become an active booking file.
Check these first
- Open the preview and confirm it looks like the original.
- If conversion cannot complete, check that the file opens normally on your device.
What to do next
Approve the preview when it is correct. If conversion keeps failing, save/export the document as PDF and upload that instead.
The booking says the session expired or is already booked.
Why this happens
The draft is no longer uploadable, or checkout already started.
Check these first
- Read the message in the main wizard, not only the file row.
- Please avoid starting a second payment while the earlier booking is being recovered.
What to do next
Follow the wizard recovery action. A terminal session cannot be repaired by Retry; contact us if you need help finding the existing appointment.
Contact us when: Contact us if the only copy is password-protected, blurry, already signed, or the same file fails after a retry on another connection.
4Step
Choose a time
Times are shown in the appointment time zone. Pick a slot when every signer can be present with their ID and camera ready.
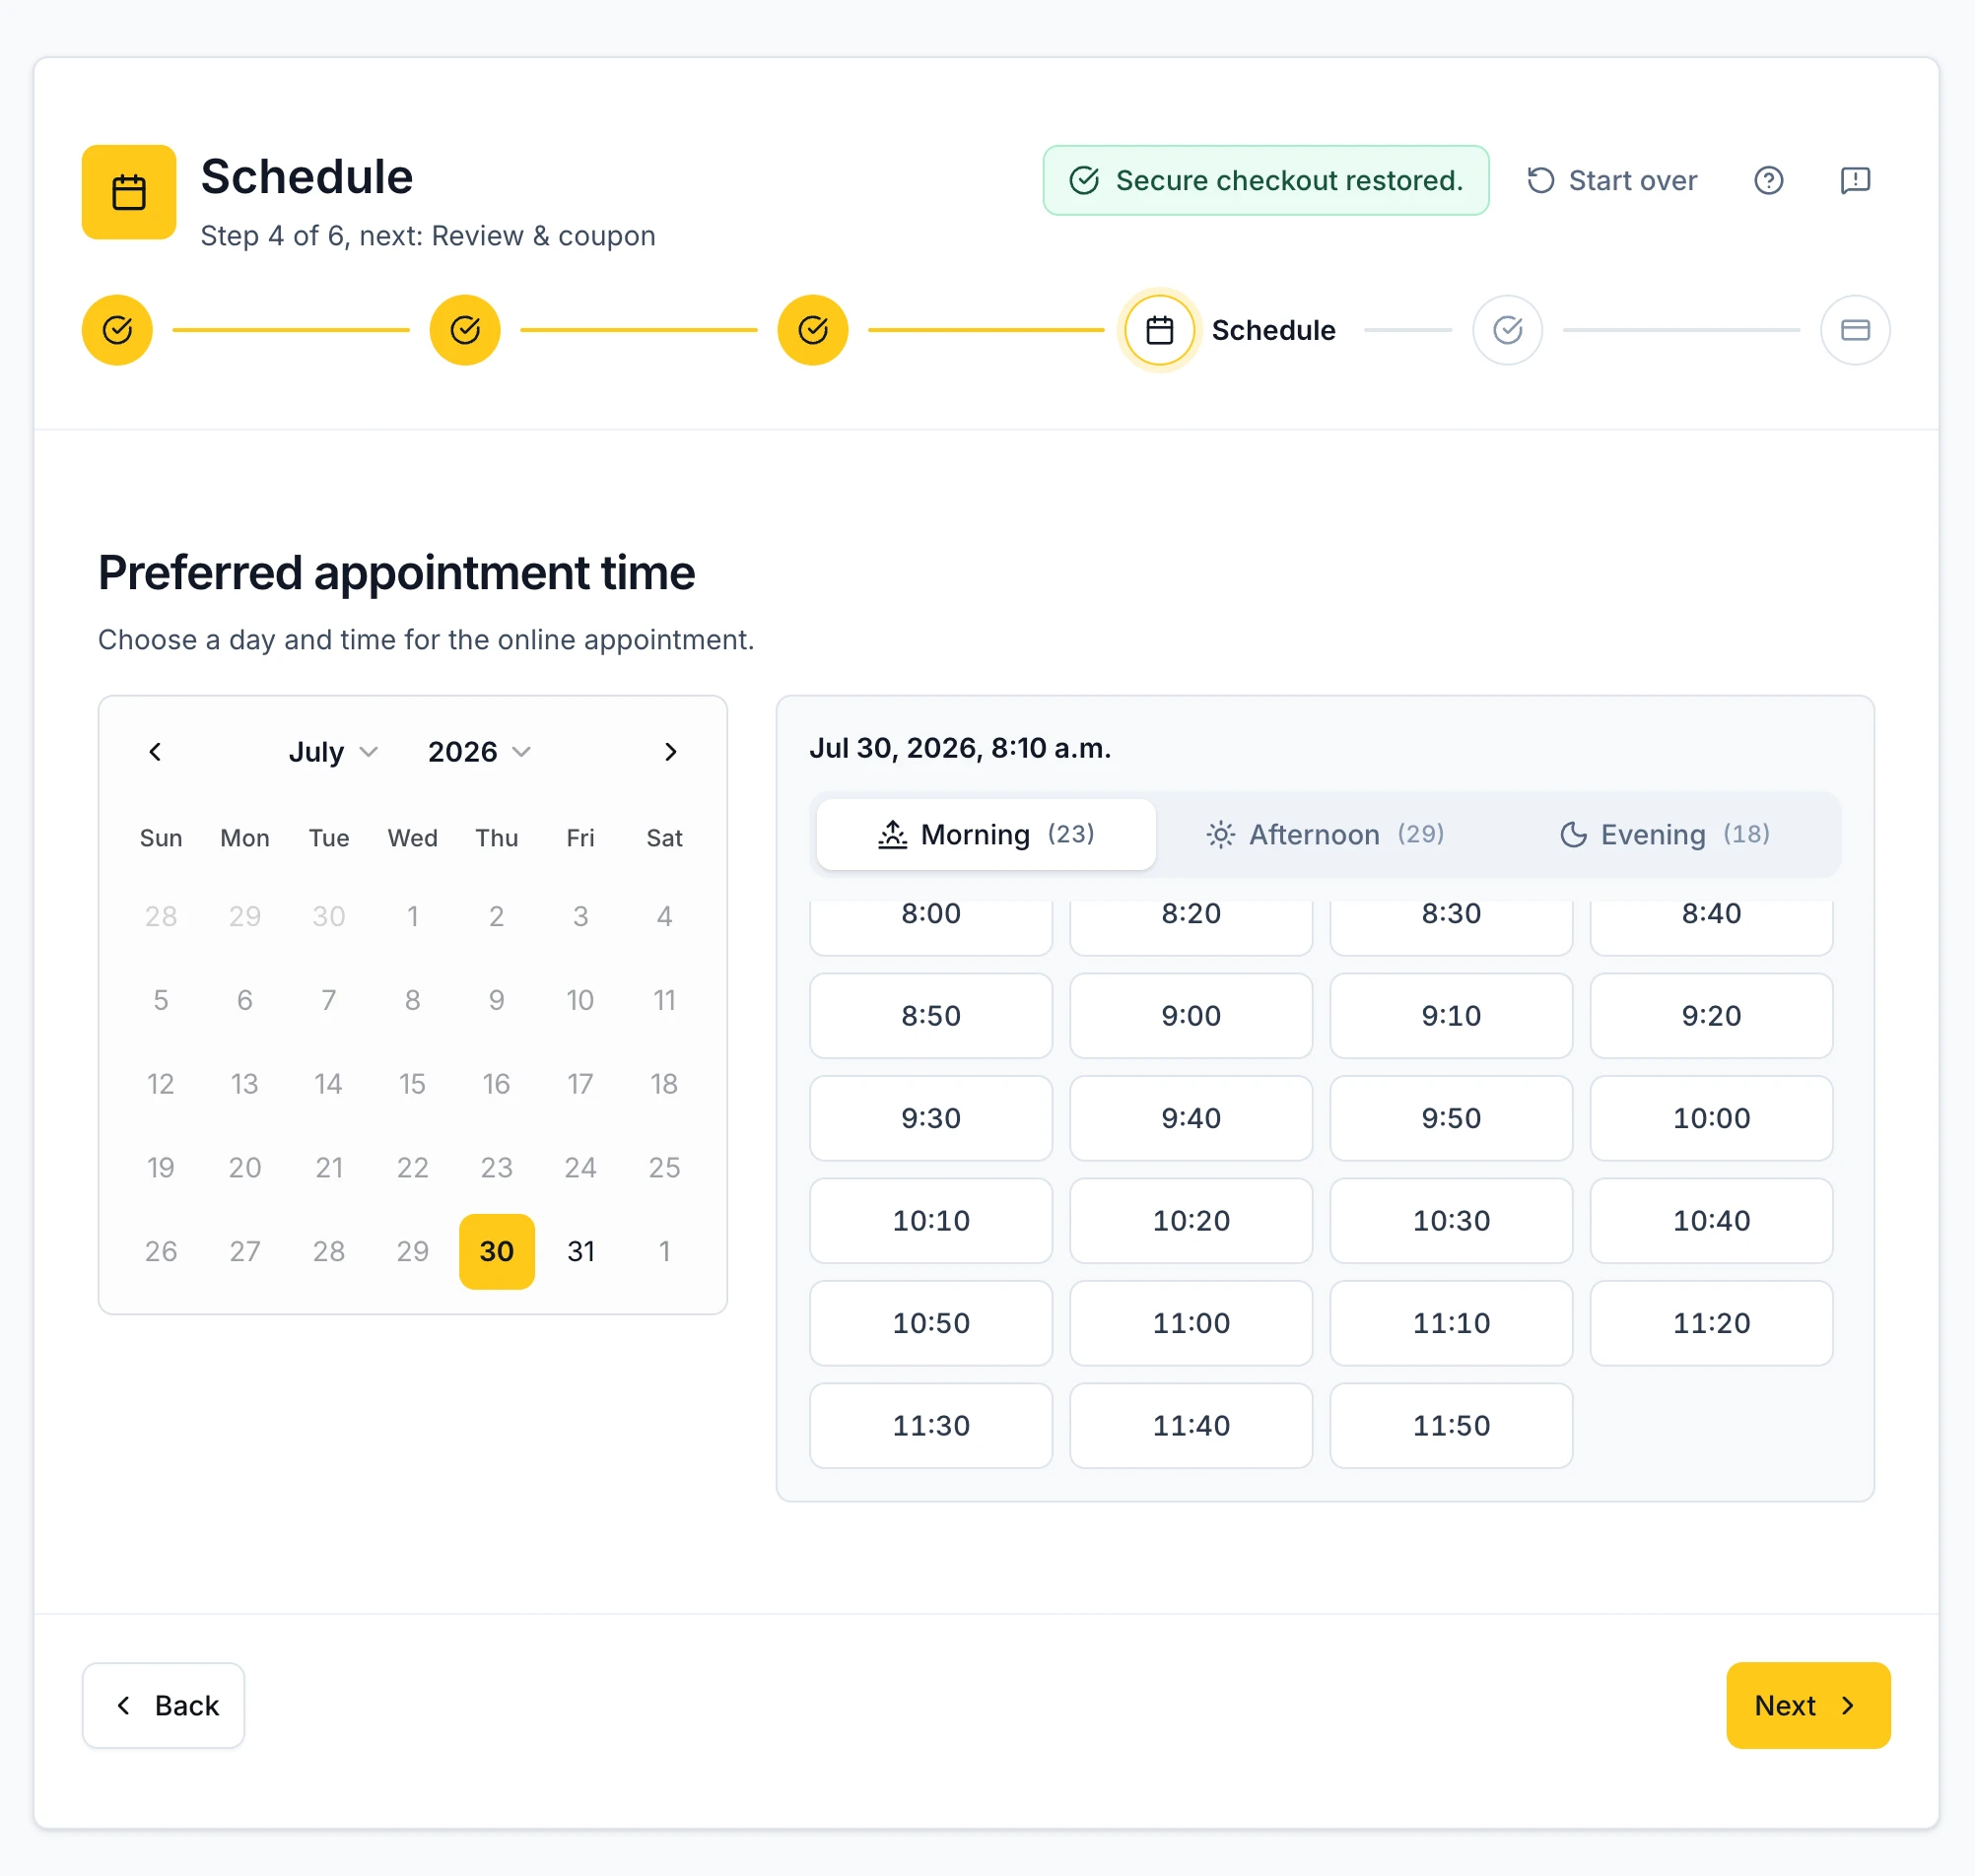
- Pick an available appointment slot in your local time.
- Continue to payment soon: your time is held on your booking for a short while, and payment is what secures it.
You’ll need
- A time when every signer can attend
- Stable internet and camera access
What each field means
| Appointment slot | When all required people meet the notaryChoose an available time in the displayed Ottawa time zone. |
| Hold | Keeps your chosen time on the booking while you finishContinue to Review before the hold expires. Payment secures your time. |
Find your situation
Solve a problem at this step
Choose what you see on screen. Each answer explains why it happens, what to check, and the safest next action.
The page says “Checking times…” for too long.
Why this happens
Availability is loading from the calendar, or the request timed out.
Check these first
- Wait for the message to change before selecting a slot.
- Try the Retry action in the preview or open the date/time picker.
What to do next
Choose a different date/time after retrying. If the calendar still cannot load, contact us with the date you need.
No slots appear for the date you chose.
Why this happens
There are no openings on that date, or the preview has not loaded the full calendar yet.
Check these first
- Try the next day and another time-of-day filter.
- Use “Choose a different date or time” to open the full picker.
What to do next
Please choose another displayed opening. An empty preview does not mean we are unavailable; availability changes as other customers book.
The slot disappeared after you selected it.
Why this happens
Another customer completed a booking for that time first.
Check these first
- Look for the active hold message before moving on.
- Check whether another slot is still selectable.
What to do next
Choose the next available slot. Only continue once the page shows your hold.
The page says another customer may also be booking your time.
Why this happens
Someone else picked the same time and has not paid yet. A time is only taken once a booking is paid.
Check these first
- The note does not stop you; Next still works.
- Decide whether a different time would suit you just as well.
What to do next
Continue with that time, or choose another one. If both bookings go through, we contact you to arrange a time that works.
The hold expired while reviewing.
Why this happens
The short hold on your chosen time ran out before payment/review finished.
Check these first
- Confirm the review still shows the time you intended.
- Return to Schedule if the time is no longer marked as held.
What to do next
Select a new time so the wizard can hold it for you, then continue to payment.
Contact us when: Contact us when you need same-day help, a time outside the calendar, or an accessibility accommodation.
5Step
Review everything
This is your last calm check. Fix anything here before payment so there are no surprises at the appointment.
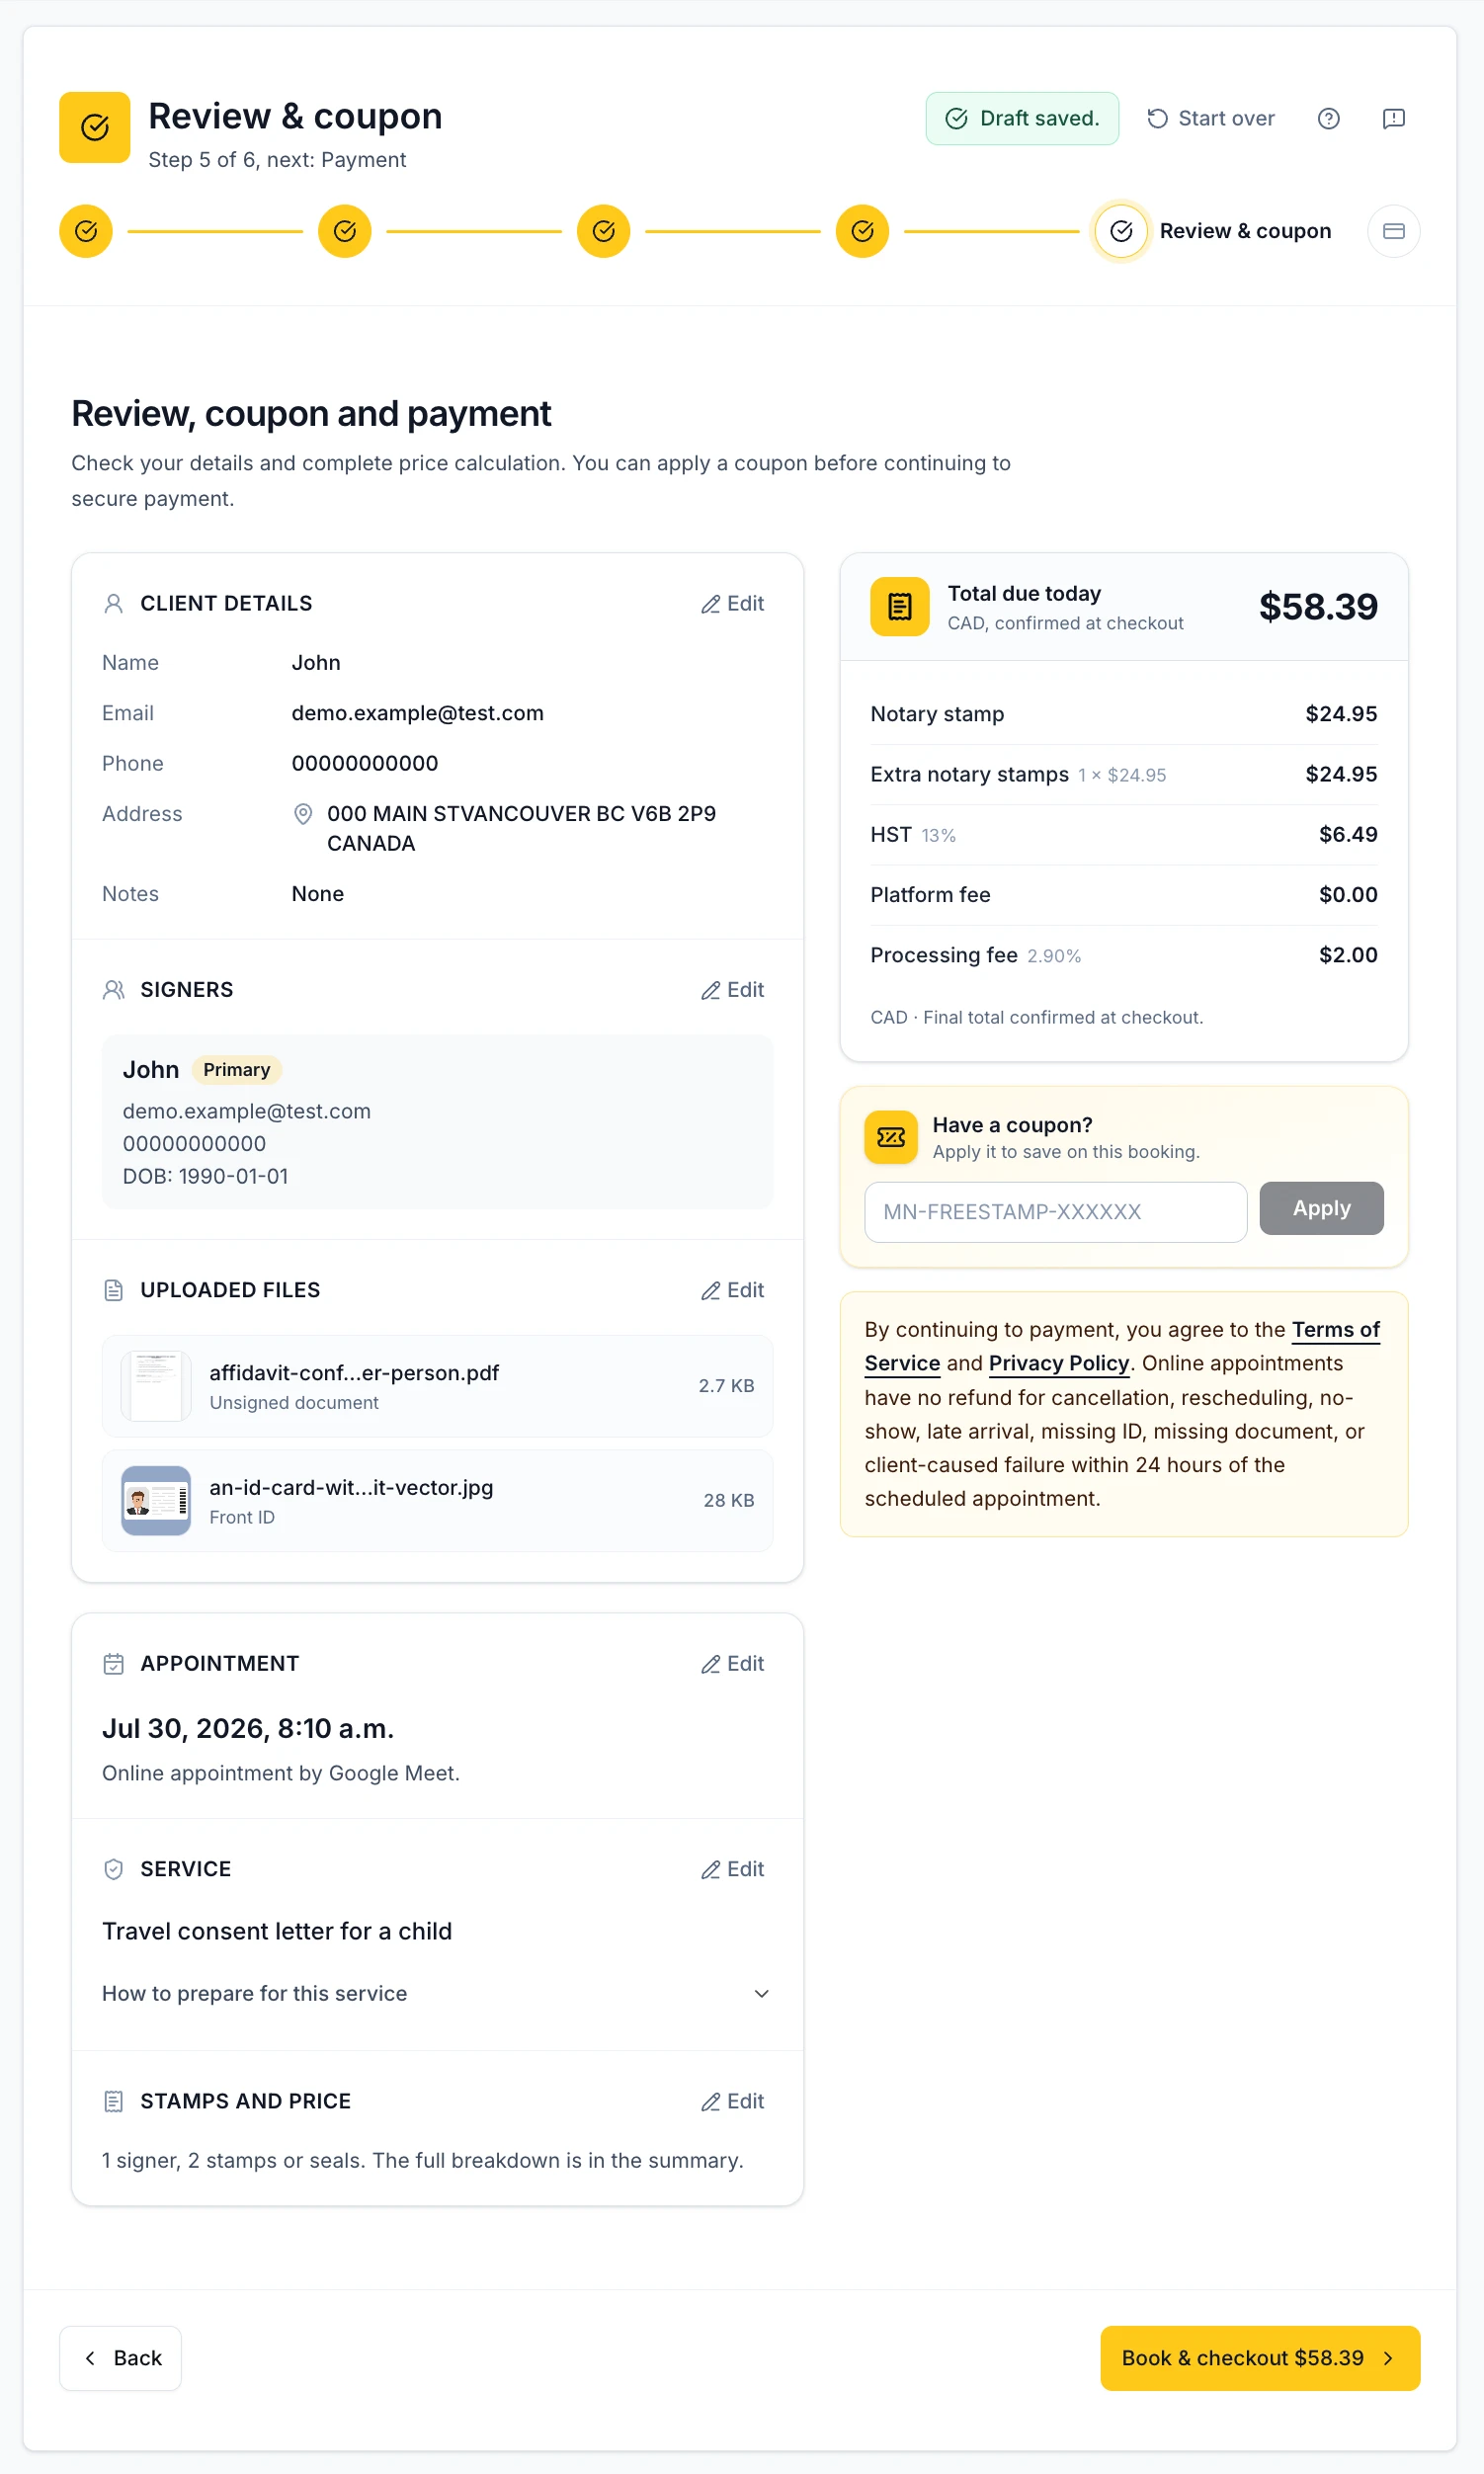
- Check people, files, time, and price before continuing.
- Correct anything that is not exact using the step navigation.
You’ll need
- A final review of every field
- Your coupon code, if you have one
What each field means
| People and files | Final accuracy checkNames, signer count, files, time, and price should all be correct. |
| Coupon | Optional discount codeEnter it exactly as provided. |
Find your situation
Solve a problem at this step
Choose what you see on screen. Each answer explains why it happens, what to check, and the safest next action.
The total is different from what you expected.
Why this happens
The calculation reflects stamp count, additional signers, shipping, or an applied coupon.
Check these first
- Compare the people/signers and stamp count with the document.
- Open the pricing breakdown and check that a coupon is marked applied, not only typed.
What to do next
Edit the Service or Details section, correct the count, and return to Review. Please continue to payment only once the displayed total is the one you expect.
Book & checkout is disabled.
Why this happens
A required file, held appointment, or validation field is missing.
Check these first
- Look for the highlighted Review warning.
- Confirm the document, every required front ID, and a current held time are present.
What to do next
Use the Edit button on the section named in the warning. Fix it there, then return to Review.
A coupon was typed, but the total did not change.
Why this happens
Typing a code does not reserve the discount. The code must be applied successfully and may be expired, already used, or unavailable to this draft.
Check these first
- Look for the applied-coupon confirmation and a discount line in the price breakdown.
- Check the code for spaces or mistyped letters and numbers.
What to do next
Apply the corrected code once. If the screen says it is no longer valid, continue without it or contact us about that specific code, as a discount cannot be applied after payment has been taken.
Contact us when: Contact us if the document or signer list changed after you reviewed it.
6Step
Complete payment
Payment is the final step. Stay on the page until you see a confirmation and receive the booking email.
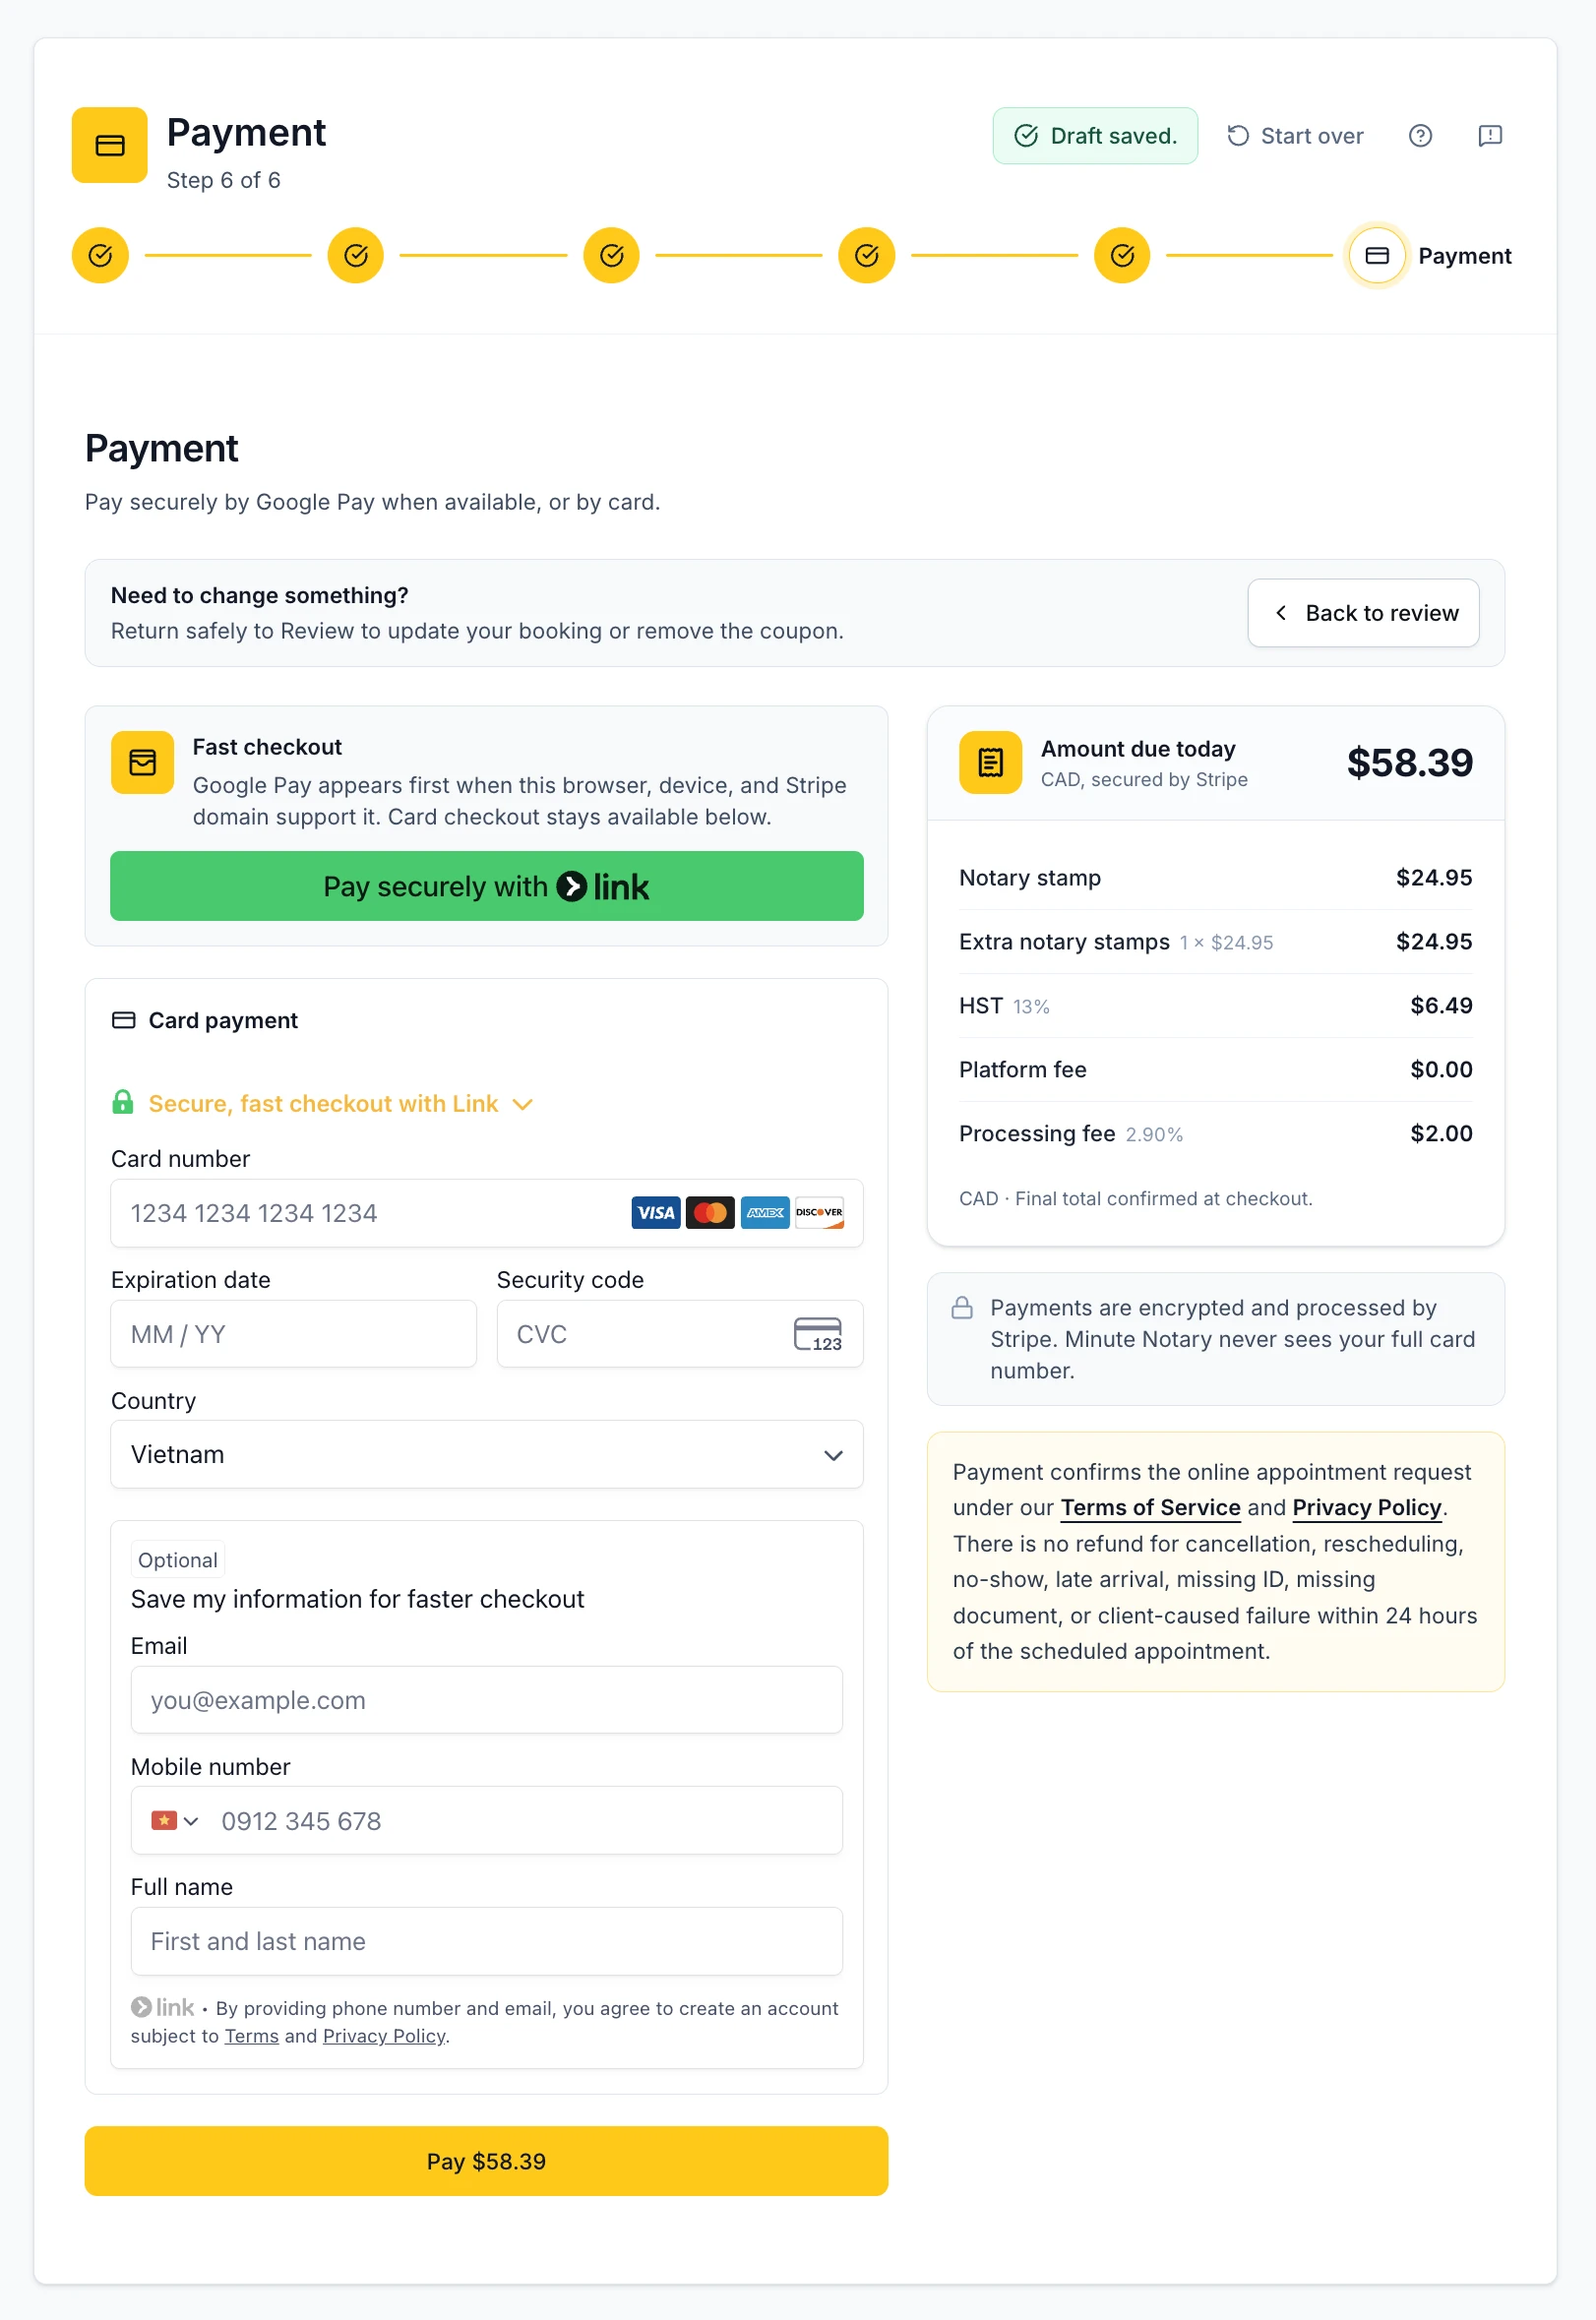
- Enter payment details in the secure checkout panel.
- Wait for confirmation before closing the page or trying again.
You’ll need
- A supported payment card or wallet
- A few minutes to wait for confirmation
What each field means
| Checkout | Secure payment confirmationPlease wait for the confirmation before closing the page. |
Find your situation
Solve a problem at this step
Choose what you see on screen. Each answer explains why it happens, what to check, and the safest next action.
The card is declined.
Why this happens
The bank or card network rejected the authorisation, often because of a limit, billing mismatch, or bank security check.
Check these first
- Confirm the billing details and card expiry/CVC.
- Try the bank-approved wallet/card option shown at checkout, or contact your bank.
What to do next
If a card is declined, please try a different card or wallet rather than resubmitting the same one.
Checkout is spinning or returns to the booking.
Why this happens
The payment provider is still resolving the attempt, or the browser lost the return handoff.
Check these first
- Wait briefly and look for a recovery/status action.
- Check your email and bank app before trying another payment.
What to do next
Use the displayed recovery action or contact us. Please wait until the first payment status is clear before starting another booking.
You see a charge but no confirmation email.
Why this happens
The provider may have succeeded while the browser returned late.
Check these first
- Please do not submit another payment; contact us first and we will check the charge for you.
- Keep the appointment details and the time of the charge available for support.
What to do next
Contact us so we can check the booking safely and resend confirmation if appropriate.
Contact us when: Contact us if you were charged but did not receive confirmation so we can check safely.
Booking guide
Ready when you are.
If something feels unclear, use the small report button in the booking flow. We’ll see the step and what you typed, so you won’t have to explain it twice.